Table Of Contents
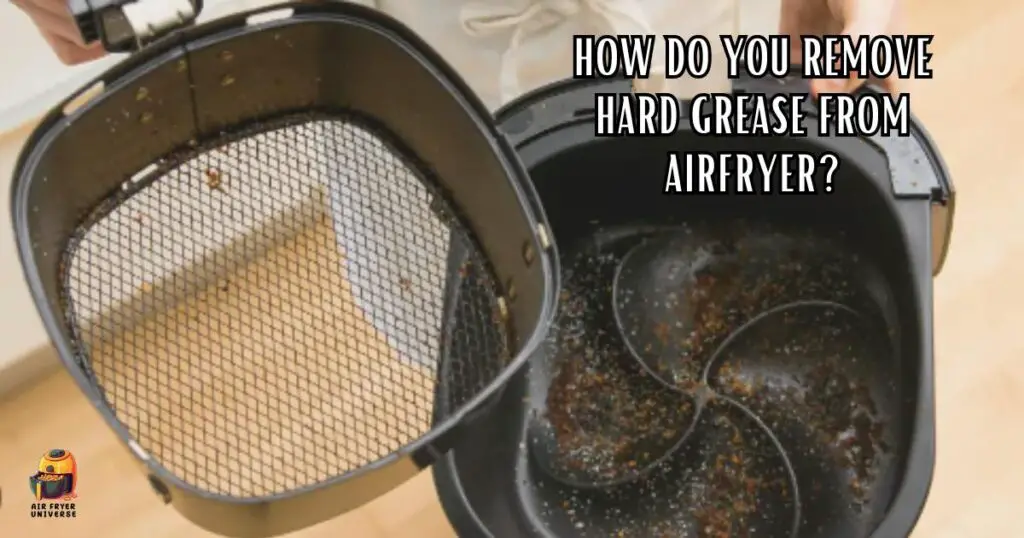
Removing hard grease from your air fryer can be done with a few simple steps. First, turn off the air fryer and let it cool fully. Then, remove the basket and tray. Soak them in hot, soapy water for about 30 minutes to loosen the grease.
After soaking, scrub the surfaces with a non-abrasive sponge or brush to remove the grease buildup. For stubborn spots, you can make a paste using baking soda and water and gently scrub.
Rinse thoroughly, dry with a clean cloth, and reassemble your air fryer. Regular cleaning after each use can help prevent hard grease buildup in the future.
10 Steps on How Do You Remove Hard Grease From Air Fryer
Here are step-by-step instructions on how to effectively remove hard grease from your air fryer:
- Safety Precautions: Before starting, ensure your air fryer is unplugged and completely cool. This essential precaution minimizes the risk of accidents and injuries, ensuring your well-being throughout the process.
- Disassemble the Air Fryer: Remove the air fryer’s removable parts. This typically includes the cooking basket, tray, and any other detachable components. These parts are usually dishwasher safe, so place them in the dishwasher for later cleaning.
- Soak in Soapy Water: Fill your sink or a large container with hot water and add a few drops of mild dishwashing liquid. Submerge the basket and tray in this soapy water. Give them around 30 minutes to soak. The warm, soapy water will help soften and loosen the hardened grease.
- Initial Wipe Down: After soaking, use a non-abrasive sponge, soft cloth, or a non-scratch scrubbing pad to gently wipe away the softened grease. Start with the interior walls and heating element. Apply a bit more pressure for stubborn spots, but avoid using abrasive materials that could damage the non-stick coating.
- Baking Soda Paste (Optional): For particularly tough stains or areas with caked-on grease, you can create a paste by mixing baking soda with a small amount of water. Apply this paste to the stubborn spots and allow it to sit for a few minutes. Then, gently scrub with your sponge or cloth.
- Address Nooks and Crannies: Use a crevice tool, an old toothbrush, or a soft brush to clean hard-to-reach areas like vents, corners, and crevices inside the air fryer. This thorough approach ensures every part is cleaned.
- Rinse Thoroughly: Rinse the basket and tray thoroughly with warm water, ensuring all soap, baking soda residue, and grease are completely removed. Rinse repeatedly if needed to ensure no residue remains.
- Dry Completely: Dry the components with a clean cloth, or absorbent paper towels, or leave them to air dry completely. Ensuring there’s absolutely no residual moisture is essential to prevent potential problems such as rust or lasting damage over time.
- Reassemble: After ensuring that all the cleaned components are entirely dry, proceed to reassemble your air fryer by carefully placing the basket and tray back into their respective positions within the unit. Ensure they fit securely for safe and effective future use.
- Regular Maintenance: To prevent future grease buildup, make it a habit to clean your air fryer after each use. Wipe down the interior with a damp cloth or sponge and clean the basket and tray as usual. Regular maintenance can significantly reduce the need for intensive cleaning sessions.
Read More:
Why Does Hard Grease Build Onto the Air Fryer?
Hard grease can build up in an air fryer due to several factors:
Cooking Oils
One common reason for hard grease formation is the use of cooking oils or sprays. When these oils are subjected to the high cooking temperatures of the air fryer, they can disperse into tiny droplets. These microscopic oil droplets become airborne during the cooking process, floating through the hot air currents.
As the cooking cycle concludes, these droplets settle on various interior surfaces of the air fryer. Over time, these once-liquid droplets solidify into a tenacious layer of hard grease.
Food Particles
Another contributing factor is the release of small food particles, particularly those with high-fat content, during cooking. These particles are emitted as food undergoes air frying.
They can drift through the hot air and adhere to the air fryer’s heating element, cooking basket, and other components. As they accumulate, they combine with airborne oil droplets and slowly transform into stubborn hard grease deposits.
High Cooking Temperatures
Air fryers are designed to cook at relatively high temperatures, and this characteristic can lead to grease-related issues. When oils and fats are subjected to these elevated temperatures, they can splatter and create a sticky residue on the interior surfaces. As this residue cools down after cooking, it hardens, contributing to the gradual buildup of hard grease.
Inadequate Cleaning
Neglecting proper cleaning practices after each use can exacerbate the problem. When an air fryer is not cleaned thoroughly and promptly, residual grease and food particles can accumulate.
As time passes, these remnants harden, making it increasingly challenging to remove the stubborn buildup.
Food Residue
Some foods, especially those with a high sugar content, can produce sticky residues when cooked in the air fryer. These residues can combine with existing grease, enhancing their adhesion to the appliance’s surfaces.
How Can I Tell if My Air Fryers Are Caked With Grease
Identifying hard grease buildup in your air fryer is essential for ensuring its proper function and safety. Observe the following indications:
Visual Examination
Open the air fryer and carefully inspect its interior. Look for dark, discolored spots, especially on the heating element, basket, walls, and other surfaces. These spots often indicate the presence of hardened grease.
Texture Test
Gently touch the interior surfaces with your fingers. If you feel a sticky or tacky residue that doesn’t come off easily, it’s likely to be hardened grease. Pay close attention to areas around the heating element and where food particles tend to accumulate.
Unpleasant Odors
During cooking, if you notice unusual or burnt odors emanating from the air fryer, it could be a sign that accumulated hard grease is being heated. These odors can be unpleasant and affect the taste of your food.
Reduced Efficiency
Hard grease buildup can hinder the air fryer’s performance. If you experience longer cooking times, uneven cooking results, or a drop in overall cooking quality, it may be due to grease obstructing the appliance’s function.
Smoke or Steam
When using the air fryer, watch for smoke or excessive steam escaping from the appliance. This could occur when the accumulated hard grease heats up and produces these emissions.
Strange Noises
Pay attention to any unusual noises while using your air fryer, like popping or sizzling sounds. These noises may signal that hardened grease is reacting to the heat, highlighting the presence of grease buildup.
Cleaning Difficulty
If you find that cleaning the air fryer has become progressively more challenging, especially in areas where cleaning was previously straightforward, it’s a strong indicator of hard grease buildup.
8 Natural Degreasers for Air Fryer
Certainly! Here are some natural degreasers that you can use to clean your air fryer:
- White Vinegar
White vinegar is a versatile and powerful degreaser. In a spray bottle, combine white vinegar and water in equal parts. Spray the solution onto greasy areas inside your air fryer, particularly the basket and tray. Let it sit for about 10-15 minutes to loosen the grease. Afterward, use a sponge or cloth to wipe away the grease. Rinse with water and dry thoroughly.
- Baking Soda
Baking soda is excellent for scrubbing away stubborn grease. By combining baking soda and a tiny amount of water, make a paste. Apply the paste to greasy spots, especially the interior walls and heating elements. Let it sit for 15-20 minutes, then scrub gently with a non-abrasive sponge or cloth. Rinse with water and dry.
- Lemon Juice
Lemon juice contains natural citric acid, which is effective at cutting through grease. Squeeze fresh lemon juice onto greasy areas and allow it to sit for about 10 minutes. Use a sponge or cloth to wipe away the softened grease. Additionally, lemon juice has a fresh fragrance.
- Dish Soap
Mild dish soap is an effective degreaser. To make a soapy solution, combine a few drops of dish soap with warm water. Soak a cloth or sponge in the soapy water and use it to scrub greasy surfaces, including the basket, tray, and interior walls. Rinse with water and dry thoroughly.
- Cornstarch
Cornstarch is great for absorbing and lifting away grease. Make a paste by mixing cornstarch with a little water. Apply the paste to greasy areas, particularly the basket and tray. Allow it to dry completely, then use a cloth or sponge to wipe it away, along with the absorbed grease.
- Hydrogen Peroxide
Hydrogen peroxide is a disinfectant and degreaser. In a spray bottle, combine water and hydrogen peroxide in equal parts. Spray the mixture on greasy surfaces, then wait a few minutes before wiping it off. With a towel or sponge, remove the grease. Rinse with water and dry.
- Olive Oil
Surprisingly, a small amount of olive oil on a cloth can help dissolve and remove grease. Wipe greasy areas with the oiled cloth to loosen the grease, then follow up with a clean, dry cloth to remove the residue and excess oil.
- Club Soda
The effervescence of club soda can help loosen grease. Pour club soda onto greasy spots inside the air fryer and let it bubble for a few minutes. Afterward, use a sponge or cloth to wipe away the loosened grease. Rinse with water and dry.
What Are the Best Practices for Storing an Air Fryer Between Uses?
Storing an air fryer between uses is essential to keep it in optimal condition. Here’s a more detailed guide on best practices for air fryer storage:
- Always allow your air fryer to cool down completely before storing it. This prevents any potential accidents or damage due to hot surfaces.
- After each use, take the time to clean your air fryer thoroughly. Remove all removable parts, such as the basket, tray, and racks. If they are dishwasher-safe, run them through the dishwasher or wash them in warm, soapy water. Clean the interior and exterior surfaces to remove any grease, food residue, or stains.
- If your air fryer allows for it, disassemble it as much as possible for cleaning. This includes removing and cleaning components like the heating element and fan. Refer to your user manual for guidance on disassembly and cleaning specific to your model.
- Ensure that all cleaned components are completely dry before storing them. This helps prevent mold, mildew, or rust from forming in your air fryer.
- Choose a suitable storage location for your air fryer. It should be in a cool, dry area away from heat sources and the sun. Avoid storing it in a humid area to prevent moisture-related issues.
- Consider using a protective cover or bag designed for air fryers. This additional layer of protection can keep your appliance free from dust and debris during storage.
- If your air fryer has a detachable cord, unplug and store it separately. This prevents cord tangles and potential damage.
- Keep the user manual in a safe place where you can easily find it. The manual contains valuable information about your air fryer’s features, cleaning instructions, and troubleshooting tips.
- Periodically inspect your stored air fryer for any signs of wear, damage, or pests. Checking it occasionally ensures that you can address issues promptly.
- While proper storage is essential, remember to use your air fryer regularly. Regular use helps maintain its functionality and prevents components from seizing up due to inactivity.
FAQs
Does Vinegar Dissolve Grease?
No, vinegar does not dissolve grease. When it comes to dealing with oil spills and messes on surfaces, they are acidic and ineffective in dissolving grease. Instead, opt for an alkaline cleaning agent like dish soap when tackling oil spills and messes on surfaces.
Does WD 40 Remove Grease?
Yes, WD 40 removes grease. Use the WD-40 multi-use product to effectively clean your greasy engine compartment. Spray it across the affected area, then use water to wash away the accumulated grease and grime. For more stubborn spots, employ a small brush to ensure thorough cleaning, especially in hard-to-reach nooks.
How Do You Remove Old Hardened Grease?
To tackle stubborn grease stains, turn to white vinegar. Give the caked-on grease stains a good vinegar spray, and let it sit for a few minutes to loosen the grime. Then, wipe it away with a sponge for effective cleaning.
Is Vinegar or Baking Soda Better for Grease?
Individually, both vinegar and baking soda are effective cleaning agents. Baking soda can dissolve grease and dirt on its own, while distilled white vinegar is excellent at breaking down minerals without leaving any stains on surfaces, unlike apple cider vinegar.
What is the Best Cleaner to for Grease and Grime?
According to our recommended choices, Goo Gone Kitchen Degreaser is safe and efficient across various surfaces. Its foam spray formula ensures ease of use and excels at tackling stubborn baked-on food stains. For those on a budget, Comet Cleaner with Bleach is a cost-effective alternative that offers versatile surface cleaning and deodorization.
Final Verdict
Removing hard grease from your air fryer is a breeze with the right steps. By disassembling, soaking, and scrubbing the components, you can enjoy a clean and safe cooking appliance. Remember, regular maintenance will prevent grease buildup, ensuring your air fryer remains a reliable kitchen companion.
With a little effort, you’ll have a spotless air fryer ready to cook up delicious, healthier meals, and you’ll be free from worries about grease and grime affecting your cooking experience.
Keep your air fryer in tip-top shape, and culinary adventures await!
You May Also Like to Read: